Education in the general sense is any act or experience that has a formative effect on the mind, character, or physical ability of an individual. In its technical sense, education is the process by which society deliberately transmits its accumulated knowledge, skills, and values from one generation to another. Education can also be defined as the process of becoming an educated person. An educated person refers to a person that has access to optimal states of mind regardless of the situation they are in. That person is able to perceive accurately, think clearly and act effectively to achieve self-selected goals and aspirations.

Educational is focused on information sharing Currently the most widely used style Located the student at the center of the self-teach Circle Access at any time any place Easy participation, enormous resource and well organized knowledge Give a typical example
Loading
Hosting Unlimited Indonesia
Showing posts with label Windows XP. Show all posts

Tips and Tricks Win XP Tweaks

Tips and Tricks Win XP Tweaks
start up windows xp


Windows Prefetcher
******************
[HKEY_LOCAL_MACHINE \ SYSTEM \ CurrentControlSet \ Control \ Session Manager \ Memory Management \ PrefetchParameters]

Under this key there is a setting called EnablePrefetcher, the default setting of which is 3. Increasing this number to 5 gives the prefetcher system more system resources to prefetch application data for faster load times. Depending on the number of boot processes you run on your computer, you may get benefits from settings up to 9. However, I do not have any substantive research data on settings above 5 so I cannot verify the benefits of a higher setting. This setting also may effect the loading times of your most frequently launched applications. This setting will not take effect until after you reboot your system.


Master File Table Zone Reservation
**********************************
[HKEY_LOCAL_MACHINE \ SYSTEM \ CurrentControlSet \ Control \ FileSystem]

Under this key there is a setting called NtfsMftZoneReservation, the default setting of which is 1. The range of this value is from 1 to 4. The default setting reserves one-eighth of the volume for the MFT. A setting of 2 reserves one-quarter of the volume for the MFT. A setting of 3 for NtfsMftZoneReservation reserves three-eighths of the volume for the MFT and setting it to 4 reserves half of the volume for the MFT. Most users will never exceed one-quarter of the volume. I recommend a setting of 2 for most users. This allows for a "moderate number of files" commensurate with the number of small files included in most computer games and applications. Reboot after applying this tweak.


Optimize Boot Files
****************
[HKEY_LOCAL_MACHINE \ SOFTWARE \ Microsoft \ Dfrg \ BootOptimizeFunction]

Under this key is a text value named Enable. A value of Y for this setting enables the boot files defragmenter. This setting defragments the boot files and may move the boot files to the beginning (fastest) part of the partition, but that last statement is unverified. Reboot after applying this tweak.

Optimizing Startup Programs [msconfig]
*********************************

MSConfig, similar to the application included in Win9x of the same name, allows the user to fine tune the applications that are launched at startup without forcing the user to delve deep into the registry. To disable some of the applications launched, load msconfig.exe from the run command line, and go to the Startup tab. From there, un-ticking the checkbox next to a startup item will stop it from launching. There are a few application that you will never want to disable (ctfmon comes to mind), but for the most part the best settings vary greatly from system to system.

As a good rule of thumb, though, it is unlikely that you will want to disable anything in the Windows directory (unless it's a third-party program that was incorrectly installed into the Windows directory), nor will you want to disable anything directly relating to your system hardware. The only exception to this is when you are dealing with software, which does not give you any added benefits (some OEM dealers load your system up with software you do not need). The nice part of msconfig is that it does not delete any of the settings, it simply disables them, and so you can go back and restart a startup application if you find that you need it. This optimization won't take effect until after a reboot.

Bootvis Application
****************
The program was designed by Microsoft to enable Windows XP to cold boot in 30 seconds, return from hibernation in 20 seconds, and return from standby in 10 seconds. Bootvis has two extremely useful features. First, it can be used to optimize the boot process on your computer automatically. Second, it can be used to analyze the boot process for specific subsystems that are having difficulty loading. The first process specifically targets the prefetching subsystem, as well as the layout of boot files on the disk. When both of these systems are optimized, it can result in a significant reduction in the time it takes for the computer to boot.

Before attempting to use Bootvis to analyze or optimize the boot performance of your system, make sure that the task scheduler service has been enabled – the program requires the service to run properly. Also, close all open programs as well – using the software requires a reboot.

To use the software to optimize your system startup, first start with a full analysis of a fresh boot. Start Bootvis, go to the Tools menu, and select next boot. Set the Trace Repetition Settings to 2 repetitions, Start at 1, and Reboot automatically. Then set the trace into motion. The system will fully reboot twice, and then reopen bootvis and open the second trace file (should have _2 in the name). Analyze the graphs and make any changes that you think are necessary (this is a great tool for determining which startup programs you want to kill using msconfig). Once you have made your optimizations go to the Trace menu, and select the Optimize System item. This will cause the system to reboot and will then make some changes to the file structure on the hard drive (this includes a defragmentation of boot files and a shifting of their location to the fastest portion of the hard disk, as well as some other optimizations). After this is done, once again run a Trace analysis as above, except change the starting number to 3. Once the system has rebooted both times, compare the charts from the second trace to the charts for the fourth trace to show you the time improvement of the system's boot up.

The standard defragmenter included with Windows XP will not undo the boot optimizations performed by this application.

IRQ Priority Tweak
****************
[HKEY_LOCAL_MACHINE \ System \ CurrentControlSet \ Control \ PriorityControl]

You will need to create a new DWORD: IRQ#Priority (where # is the number of the IRQ you want to prioritize) and give it a setting of 1. This setting gives the requisite IRQ channel priority over the other IRQs on a software level. This can be extremely important for functions and hardware subsystems that need real-time access to other parts of the system. There are several different subsystems that might benefit from this tweak. Generally, I recommend giving either the System CMOS or the video card priority. The System CMOS generally has an IRQ setting of 8, and giving it priority enhances the I/O performance of the system. Giving priority to the video card can increase frame rates and make AGP more effective.

You can give several IRQs priority, but I am not entirely certain how the system interacts when several IRQs are given priority – it may cause random instabilities in the system, although it is more likely that there's a parsing system built into Windows XP to handle such an occurrence. Either way, I would not recommend it.

QoS tweak
*********
QoS (Quality of Service) is a networking subsystem which is supposed to insure that the network runs properly. The problem with the system is that it eats up 20% of the total bandwidth of any networking service on the computer (including your internet connection). If you are running XP Professional, you can disable the bandwidth quota reserved for the system using the Group Policy Editor [gpedit.msc].

You can run the group policy editor from the Run command line. To find the setting, expand "Local Computer Policy" and go to "Administrative Templates" under "Computer Configuration." Then find the "Network" branch and select "QoS Packet Scheduler." In the right hand box, double click on the "Limit Reservable Bandwidth." From within the Settings tab, enable the setting and then go into the "Bandwidth Limit %" and set it to 0%. The reason for this is that if you disable this setting, the computer defaults to 20%. This is true even when you aren't using QoS.

Free Idle Tasks Tweak
******************

This tweak will free up processing time from any idle processes and allow it to be used by the foreground application. It is useful particularly if you are running a game or other 3D application. Create a new shortcut to "Rundll32.exe advapi32.dll,ProcessIdleTasks" and place it on your desktop. Double-click on it anytime you need all of your processing power, before opening the application.

Windows Indexing Services
Windows Indexing Services creates a searchable database that makes system searches for words and files progress much faster – however, it takes an enormous amount of hard drive space as well as a significant amount of extra CPU cycles to maintain the system. Most users will want to disable this service to release the resources for use by the system. To turn off indexing, open My Computer and right click on the drive on which you wish to disable the Indexing Service. Enter the drive's properties and under the general tab, untick the box for "Allow the Indexing Service to index this disk for fast file searching."

Priority Tweak
************
[HKEY_LOCAL_MACHINE \ SYSTEM \ CurrentControlSet \ Control \ PriorityControl]

This setting effectively runs each instance of an application in its own process for significantly faster application performance and greater stability. This is extremely useful for users with stability problems, as it can isolate specific instances of a program so as not to bring down the entire application. And, it is particularly useful for users of Internet Explorer, for if a rogue web page crashes your browser window, it does not bring the other browser windows down with it. It has a similar effect on any software package where multiple instances might be running at once, such as Microsoft Word. The only problem is that this takes up significantly more memory, because such instances of a program cannot share information that is in active memory (many DLLs and such will have to be loaded into memory multiple times). Because of this, it is not recommended for anyone with less than 512 MB of RAM, unless they are running beta software (or have some other reason for needing the added stability).

There are two parts to this tweak. First is to optimize XP's priority control for the processes. Browse to HKEY_LOCAL_MACHINE \ SYSTEM \ CurrentControlSet \ Control \ PriorityControl and set the "Win32PrioritySeparation" DWORD to 38. Next, go into My Computer and under Tools, open the Folder Options menu. Select the View tab and check the "Launch folder windows in separate process" box. This setting actually forces each window into its own memory tread and gives it a separate process priority.

Powertweak application
********************
xxx.powertweak.com

Powertweak is an application, which acts much like a driver for our chipsets. It optimizes the communication between the chipset and the CPU, and unlocks several "hidden" features of the chipset that can increase the speed of the system. Specifically, it tweaks the internal registers of the chipset and processor that the BIOS does not for better communication performance between subsystems. Supported CPUs and chipsets can see a significant increase in I/O bandwidth, increasing the speed of the entire system. Currently the application supports most popular CPUs and chipsets, although you will need to check the website for your specific processor/chipset combo – the programmer is working on integrating even more chipsets and CPUs into the software.

Offload Network Task Processing onto the Network Card
**********************************************
[HKEY_LOCAL_MACHINE \ SYSTEM \ CurrentControlSet \ Services \ Tcpip \ Parameters]

Many newer network cards have the ability of taking some of the network processing load off of the processor and performing it right on the card (much like Hardware T&L on most new video cards). This can significantly lower the CPU processes needed to maintain a network connection, freeing up that processor time for other tasks. This does not work on all cards, and it can cause network connectivity problems on systems where the service is enabled but unsupported, so please check with your NIC manufacturer prior to enabling this tweak. Find the DWORD "DisableTaskOffload" and set the value to 0 (the default value is 1). If the key is not already available, create it.

Force XP to Unload DLLs
*********************
[HKEY_LOCAL_MACHINE \ SOFTWARE \ Microsoft \ Windows \ CurrentVersion \ Explorer]
"AlwaysUnloadDLL"=dword:00000001

XP has a bad habit of keeping dynamic link libraries that are no longer in use resident in memory. Not only do the DLLs use up precious memory space, but they also tend to cause stability problems in some systems. To force XP to unload any DLLs in memory when the application that called them is no longer in memory, browse to HKEY_LOCAL_MACHINE \ SOFTWARE \ Microsoft \ Windows \ CurrentVersion \ Explorer and find the DWORD "AlwaysUnloadDLL". You may need to create this key. Set the value to 1 to force the operating system to unload DLLs.

Give 16-bit apps their own separate processes
*************************************
[HKEY_LOCAL_MACHINE \ SYSTEM \ CurrentControlSet \ Control \ WOW]
"DefaultSeparateVDM"="Yes"

By default, Windows XP will only open one 16-bit process and cram all 16-bit apps running on the system at a given time into that process. This simulates how MS-DOS based systems viewed systems and is necessary for some older applications that run together and share resources. However, most 16-bit applications work perfectly well by themselves and would benefit from the added performance and stability of their own dedicated resources. To force Windows XP to give each 16-bit application it's own resources, browse to HKEY_LOCAL_MACHINE \ SYSTEM \ CurrentControlSet \ Control \ WOW and find the String "DefaultSeparateVDM". If it is not there, you may need to create it. Set the value of this to Yes to give each 16-bit application its own process, and No to have the 16-bit application all run in the same memory space.

Disable User Tracking
******************
[HKEY_CURRENT_USER \ Software \ Microsoft \ Windows \ CurrentVersion \ Policies \ Explorer]
"NoInstrumentation"=dword:00000001

The user tracking system built into Windows XP is useless to 99% of users (there are very few uses for the information collected other than for a very nosy system admin), and it uses up precious resources to boot, so it makes sense to disable this "feature" of Windows XP. To do so, browse to HKEY_CURRENT_USER \ Software \ Microsoft \ Windows \ CurrentVersion \ Policies \ Explorer and find the DWORD "NoInstrumentation". You may need to create this key if it is not there. The default setting is 0, but setting it to 1 will disable most of the user tracking features of the system.

Thumbnail Cache
**************
[HKEY_CURRENT_USER \ Software \ Microsoft \ Windows \ CurrentVersion \ Explorer \ Advanced]
"DisableThumbnailCache"=dword:00000001

Windows XP has a neat feature for graphic and video files that creates a "thumbnail" of the image or first frame of the video and makes it into an oversized icon for the file. There are two ways that Explorer can do this, it can create them fresh each time you access the folder or it can load them from a thumbnail cache. The thumbnail caches on systems with a large number of image and video files can become staggeringly large. To disable the Thumbnail Cache, browse to HKEY_CURRENT_USER \ Software \ Microsoft \ Windows \ CurrentVersion \ Explorer \ Advanced and find the DWORD "DisableThumbnailCache". You may need to create this key. A setting of 1 is recommended for systems where the number of graphic and video files is large, and a setting of 0 is recommended for systems not concerned about hard drive space, as loading the files from the cache is significantly quicker than creating them from scratch each time a folder is accessed.

How To Decrease your Applications startup time Windows XP


How To Decrease your Applications startup time Windows XP. By default, Microsoft includes the /prefetch:1 switch to speed up it's Windows Media Player application start time. This switch can be used for other Windows applications and also many third party programs.


Example #1

You have AOL 8.0 installed on the computer. Complete the steps outlined bewlo to add the /prefetch:1 switch to AOL's Target path.

  • Right click on the AOL shortcut and select properties from the menu.

  • In the Target: Field add the /prefetch:1 switch to the very end of the path, like this: "C:\ProgramFiles\America Online 8.0\aol.exe" /prefetch:1 and then click ok.

Now start AOL. It would load at least 50 times faster than ever before. 


Example #2

  • Go to the Start button/All Programs/Accessories/System Tools


Now System Restore will start immediately when executed.

Note: How To Decrease your Applications startup time Windows XP. This switch will only work with some programs. Others will return a message saying the program in the target box is invalid. Just remove the switch

Your computer appears to be correctly configured, but the device or resource (DNS server) is not responding

Issues found 
Your computer appears to be correctly configured, but the device or resource (DNS server) is not responding. Your computer appears to be correctly configured, but the device or resource (DNS server) is not responding Detected
Contact your network administrator or Internet service provider (ISP) Completed

Issues found Detection details 
Your computer appears to be correctly configured, but the device or resource (DNS server) is not responding Detected
Contact your network administrator or Internet service provider (ISP) Completed 

Windows can't communicate with the device or resource (DNS server). The computer or service you are trying to reach might be temporarily unavailable.


#Follow these methods to troubleshoot the issue.

Step 1: Check the following services.

All of these services should be started, and their startup type should be automatic.
To check:

1.     Go to start and type services.msc
2.     Select services from the search list. 

o    Computer Browser
o    DHCP Client
o    DNS Client
o    Network Connections
o    Network Location Awareness
o    Remote Procedure Call (RPC)
o    Server
o    TCP/IP Netbios helper
o    Workstation

Step 2: Reset TCP/IP

TCP/IP can sometimes become damaged or corrupted. If you cannot connect to the Internet and you have tried the above method to resolve the problem, TCP/IP might be causing it.

There’s a fix it available to reset TCP/IP automatically.

How to reset Internet Protocol (TCP/IP)
http://support.microsoft.com/kb/299357

Step 3: Flush your computer's DNS cache.

1.    Go to start and type cmd.
2.    Right-click on cmd from the programs list and select “Run as administrator”.
3.    Type ipconfig /flushdns.
A message will appear saying that your DNS cache is cleared. Start Second Life. It should run fine this time.
4.     Type ipconfig /registerdns

This command refreshes all DHCP address leases and registers all related DNS names configured and used by the client computer.

Step 4: Update your Network Adapter driver.

Select one of the available options from the link  below and install the correct driver for your operating system.

Intel® WiFi Link 5300 and Intel® WiFi Link 5100 products
http://www.intel.com/support/wireless/wlan/5300_5100/index.htm

See if it’s of any help.

For additional information on Networking issues, see this help article.

Why can’t I connect to a network?
http://windows.microsoft.com/en-US/windows7/Why-can-t-I-connect-to-a-network

 Or
Visit Microsoft Answers Feedback Forum and let us know what you think.

Create Multiple Startup Profiles with Advanced Startup Manager Windows XP

If you need to start different programs on startup, depending on what you need to do on your PC, create different startup profiles with this startup utility.

 Create Multiple Startup Profiles with Advanced Startup Manager Windows XP

With the hacks covered in this chapter, you can customize how XP starts up. But there's one thing these hacks won't be able to do for you—create different startup profiles. For that, you need downloadable software.
Let's say, for example, you have a laptop that you sometimes run attached to a keyboard, monitor, and an always-on Internet connection, and other times you travel with it, so it is not connected to the Internet. When you use it when you travel, you use it primarily in airplanes, airports, and other places where you typically aren't connected to the Internet. You also run a piece of monitoring software that will send a signal to a call center if your laptop is stolen. You don't need to run that software when you're not on the road.
Ideally, you would have one set of programs that run automatically at home and another set of programs that run when you're on the road. At home, you might want instant messenger software and file sharing software to load at startup; on the road, you don't want that software to load automatically, but you do want your monitoring software to load.
Advanced StartUp Manager—a piece of shareware from Ray's Lab (http://www.rayslab.com), shown in Figure 1-8—lets you create multiple startup profiles so that you can have separate profiles for your laptop at home and the road—or for any other purpose. It's free to try, but it costs $19.95 if you decide to keep it.

Figure 1-8. Create multiple startup profiles with Advanced Startup Manager


In addition to creating a profile for traveling and one for home, you may want to create other profiles. For example, when you want to play games, you'll want to start your system with a minimal number of services and programs running in the background, so you'll create a profile that disables a variety of services, such as the Indexing service, the Task Scheduler, and the Themes service that lets you apply themes to your PC. If you frequently need to troubleshoot your network, you'll want to create a network-troubleshooting profile that automatically starts networking analysis software.
To create a profile, add all the programs you want to run on startup, by having them start from the Startup folder, the Registry, or the Win.ini file. Where you want them to start from is up to you. To add a program, just highlight where you want it to run from, choose File -> Add Program, and choose the program's executable file. You can add switches, if you want, in the Flags field of the screen you use to add the program. You can also choose whether the program should run for just one specific user or for all users of the machine. To delete a program from the profile, right-click on it and choose Delete.
When you have built a profile with all the programs you want to run at startup, save it by choosing File -> Backup Configuration as, and then choosing a name for the profile. Create as many profiles as you want. To load a profile, choose File -> Open Backup, and choose the profile you want to load. After you've loaded a profile, the next time you start your computer it will load with that startup software. Be aware that this means you can't choose a profile when you boot your system. You have to run Advanced StartUp Manager before you exit XP, choose the profile you want to run next time you start XP, and then exit.

See Also

  • OSL 2000 (http://www.osloader.com) lets you boot from up to 100 separate operating systems (including multiple copies of XP or other versions of Windows), lets you boot from a second hard disk, and offers a variety of other features, such as an automatic boot timer. It's shareware and free to try, but it costs $25 if you decide to continue using it.
  • For software to customize shutdowns, try Shutdown Now! (http://www.dworld.de). It gives you just about every option you can imagine for shutdown. You can specify applications to launch or documents to load automatically before shutdown, schedule shutdowns, perform actions such as ejecting and loading CDs on shutdown, empty directories on shutdown, and the list goes on. It's shareware and free to try, but if you keep using it you're expected to pay $19.50.
  • For a free shutdown manager, try Switch Off (http://yasoft.km.ru/eng/switchoff), a simple shutdown utility that runs in your system tray. It lets you schedule shutdowns and perform other tasks on shutdown, such as locking your workstation, and it also lets you do any of them quickly from the system tray. It's not nearly as powerful as Shutdown Now!, but it's free.

    Published by O'Reilly & Associates, Inc., 1005 Gravenstein Highway North, Sebastopol, CA 95472.

Halt Startup Programs and Services Windows XP

Increase your PC's performance and speed up startup times by shutting off applications and services that you don't need.

 Halt Startup Programs and Services Windows XP

One of the best ways to speed up your PC without having to spend money for extra RAM is to stop unnecessary programs and services from running whenever you start your PC. When too many programs and services run automatically every time you start up your system, startup itself takes a long time, and too many programs and services running simultaneously can bog down your CPU and hog your memory.
Some programs, such as antivirus software, should run automatically at startup and always run on your computer. But many other programs, such as instant messenger software, serve no purpose by being run at startup. And while you need a variety of background services running on your PC in order for XP to function, there are many unnecessary services that run on startup. For example, on many systems, the Wireless Zero Configuration Service runs to automatically configure a WiFi (802.11) network card, even though no such card is present in the system.

Eliminating Programs that Run at Startup Windows XP

Stopping programs from running at startup is a particularly daunting task, because there is no single place you can go to stop them all. Some run because they're put in the Startup folder, others because they're part of logon scripts, others because of Registry settings and so on. But with a little bit of perseverance, you should be able to stop them from running.

Cleaning out the Startup folder
Start by cleaning out your Startup folder. Find it in C:\Documents and Settings\<User Name>\Start Menu\Programs\Startup, where <User Name> is your Windows logon name. Delete the shortcuts of any programs you don't want to run on startup. As with any shortcuts, when you delete them, you're only deleting the shortcut, not the program itself. (You can also clear out the startup items by going to Start -> Programs -> Startup and right-clicking on items you want to remove.) Next, clean out your Scheduled Tasks folder. Go to C:\WINDOWS\Tasks, and delete the shortcuts of any programs that you don't want to run automatically on a schedule.


You can bypass all the programs in your Startup folder on an as-needed basis. To stop XP from loading any programs in the Startup folder, hold down the Shift key during boot-up. No programs in the Startup folder will run, but the items will still remain there, so that they will start up as they would normally the next time you boot.


Using the System Configuration Utility
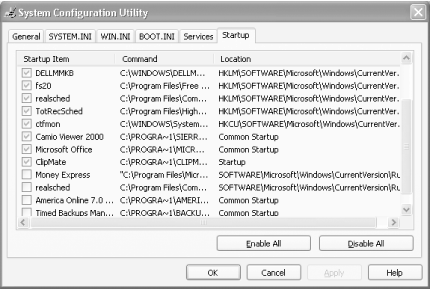
Taking the previous steps will stop the obvious programs from running at startup, but it won't kill them all. The best tool for disabling hidden programs that run on startup is the System Configuration Utility, shown in Figure 1-5. To run it, type msconfig at a command prompt and press Enter. (If that doesn't work, first do a search for msconfig.exe, and then when you find the file, double-click it.)

Figure 1-5. The Startup tab of the System Configuration Utility

 
To stop a program from running at startup, go to the Startup tab in this utility and uncheck the box next to the program. It can sometimes be difficult to understand what programs are listed on the Startup tab. Some, such as America Online, are clearly labeled. But often, you'll see a phrase or collection of letters, such as fs20. That's the name of the running file—in this case, fs20.exe, which is Free Surfer mk II, an excellent free popup killer. As you can see from the picture, I've chosen to let this useful tool run on startup.
To get more information about a listing, expand the width of the Command column near the top of the Startup tab. Expand it enough and you'll see the startup command that the program issues, including its location, such as C:\Program Files\Free Surfer\fs20.exe. The directory location should be another hint to help you know the name of the program.
When stopping programs from running at startup, it's best to stop them one at a time rather than in groups. You want to make sure that you're not causing any system problems by stopping them. So stop one and restart your PC. If it runs fine, then stop another and restart. Continue doing this until you've cleared all the programs you don't want to run automatically.
Each time you uncheck a box and restart your PC, you'll get a warning, shown in Figure 1-6, that you've used the System Configuration Utility to disable a program from starting automatically. If you don't want to see that warning, disable it by checking the box in the dialog itself.

Figure 1-6. Disabled program warning


After you've used the System Configuration Utility to identify programs that run on startup, you may want to try disabling them from with the programs themselves. So run each program that starts automatically, and see if you can find a setting that allow you to halt it from running on startup.

1.5.1.3 Using the Registry to halt programs running on startup
Even the System Configuration Utility won't necessarily let you identify and kill all programs that run on startup. You may also need to hack the Registry to disable them. To do so, run the Registry Editor and go to HKEY_CURRENT_USER\Software\Microsoft\Windows\CurrentVersion\Run. The right pane will contain a list of some of the programs that automatically run at startup. The Data field tells you the path and name of the executable so that you can determine what each program is. Right-click on any program you don't want to run, and choose Delete. That will kill any programs that run specific to your logon. To kill programs that run for every user of the system, go to HKEY_LOCAL_MACHINE\SOFTWARE\Microsoft\Windows\CurrentVersion\Run and follow the same instructions for deleting other programs you don't want to run at startup.

Disabling Services that Run at Startup Windows XP

Constantly running in the background of XP are services—processes that help the operating system run, or that provide support to applications. Many of these services launch automatically at startup. While you need many of them, there are also many that aren't required and that can slow your system down when they run in the background.
You can disable services at startup by using the System Configuration Utility, similar to the way that you halt programs from running at startup, except that you use the Services tab instead of the Startup tab. But the System Configuration Utility doesn't necessarily list every service that launches on startup. A bigger problem is that disabling services is more of shot in the dark than disabling programs. When you disable a program, you can get a sense of what the program does. But when you disable a service through the System Configuration Utility, there's often no way to know what it does.
A better way of disabling services at startup is via the Services Computer Management Console, shown in Figure 1-7. Run it by typing services.msc at the command prompt. The Services Computer Management Console includes a description of all services, so that you can know ahead of time whether a particular service is one you want to turn off. It also lets you pause the service, so that you can test out your machine with the service off to see whether it's needed or not.

Figure 1-7. The Services Computer Management Console


After you run the console, click on the Extended tab. This view will show you a description of each service in the left pane when you highlight the service. The Startup Type column shows you which services launch on startup—any services with "Automatic" in that column. Click on that column to sort together all the services that automatically launch on startup. Then highlight each of those services and read the descriptions.
When you find a service you want to disable, right-click on it and choose Properties. In the Properties dialog box that appears, choose Manual from the "Startup type" drop-down list. The service won't start automatically from now on, but you can start it manually via the console. If you want the service disabled so that it can't be run, choose Disabled. To test the effects of turning off the service, turn off any services that you don't want to run by clicking "Stop the service" in the left pane, or by right-clicking on the service and choosing Stop.
Table 1-2 lists some common services you might want to halt from running at startup.

Table 1-2. Services you might want to turn off
Service
What it does
Portable Media Serial Number
Retrieves the serial number of a portable music player attached to your PC.
Task Scheduler
Schedules unattended tasks to be run. If you don't schedule any unattended tasks, turn it off.
Uninterruptible Power Supply
Manages an Uninterruptible Power Supply (UPS) connected to your PC.
Automatic Updates
Automatically checks for Windows updates. (You can check manually by going to http://windowsupdate.microsoft.com.)
Telnet (service available on XP Pro only)
Allows a remote user to log in to your computer and run programs. (This will not be found on all versions of XP Pro.)
Wireless Zero Configuration Service
Automatically configures a WiFi (802.11) network card. Disable this only if you're not using a WiFi network card.

Published by O'Reilly & Associates, Inc., 1005 Gravenstein Highway North, Sebastopol, CA 95472.

Customize Multiboot Startup Options Windows XP

Edit or create a startup menu that lets you choose which operating system to boot into in multiboot systems, or create a menu that lets you choose different startup options for your single operating system if you have only XP installed.

 Customize Multiboot Startup Options Windows XP

If you've installed another operating system (in addition to XP) on your system, your PC starts up with a multiboot menu, which allows you to choose which operating system you want to run. The menu stays live for 30 seconds, and a screen countdown tells you how long you have to make a choice from the menu. After the 30 seconds elapse, it boots into your default operating system, which is generally the last operating system you installed.
You can customize that multiboot menu and how your PC starts by editing the boot.ini file, a hidden system file, to control a variety of startup options, including how long to display the menu, which operating system should be the default, whether to use the XP splash screen when XP starts, and similar features. And as you'll see later in this hack, you can also use the file to create a startup menu that will allow you to choose from different versions of your operating system—for example, one that you'll use for tracking down startup problems, and another for starting in Safe Mode.
The boot.ini file is a plain text file found in your root C:\ folder. You might not be able to see it, because it's a system file, and if you can see it, you might not be able to edit it, because it's a read-only file. To make it visible, launch Windows Explorer, choose View -> Tools -> Folder Options -> View and select the radio button "Show Hidden Files and Folders." To make it a file you can edit, right-click on it in Windows Explorer, choose Properties, uncheck the Read-Only box, and click OK.

Editing Files

To edit the file, open it with a text editor such as Notepad. Following is a typical boot.ini file for a PC that has two operating systems installed on it—Windows XP Home Edition and Windows Me:
[boot loader]
timeout=30
default=multi(0)disk(0)rdisk(0)partition(1)\WINDOWS
[operating systems]
multi(0)disk(0)rdisk(0)partition(1)\WINDOWS="Microsoft Windows XP Home 
Edition" /fastdetect
multi(0)disk(0)rdisk(0)partition(2)\WINNT="Windows 2000 Professional" /
fastdetect
As you can see, there are two sections in the file: [boot loader] and [operating systems]. To customize your menu and startup options, edit the entries in each section. Before editing boot.ini, make a copy of it and save it under a different name (such as boot.ini.old), so that you can revert to it if you cause problems when you edit the file.
Following are details about how to edit the entries in each section:

[boot loader]
This section controls how the boot process works; it specifies the default operating system and how long a user has to make a selection from a boot menu, if a boot menu has been enabled. The timeout value specifies, in seconds, how long to display the menu and wait for a selection before loading the default operating system. If you want a delay of 15 seconds, for example, enter 15 for the value. Use a value of 0 if you want the default operating system to boot immediately. If you want the menu to be displayed indefinitely and stay onscreen until a selection is made, use a value of -1. The default value specifies which entry in the [operating system] section is the default operating system. (The default value is used even if there is only one operating system in the [operating system] section.) To change the default operating system, edit the setting, in our example, to default=multi(0)disk(0)rdisk(0)partition(2)\WINNT.
So, in our example, if you change the menu settings so that the screen appears for 10 seconds before loading the default operating system, and the default operating system is Windows 2000 Professional, the section reads:
[boot loader]
timeout=10
default=multi(0)disk(0)rdisk(0)partition(2)\WINNT
[operating system]
This section specifies which operating systems are present on the computer, and detailed options for each one. XP uses the Advanced RISC Computing (ARC) path to specify the location of the boot partition. In our example, the ARC path is:
multi(0)disk(0)rdisk(0)partition(1)\WINDOWS
The first parameter, which identifies the disk controller, should be 0. The second parameter, the disk parameter, should also be 0. The rdisk parameter specifies the disk number on the controller that has the boot partition. The numbers start at 0. So, if you have three hard disks installed and the second hard disk has the boot partition, the setting is rdisk(1). The partition parameter identifies the partition number of the boot partition. Partitions start with the number 1. The final section, which in our example is \WINDOWS, specifies the path to the folder where the operating system is installed.
To the right of the ARC path in the example is ="Microsoft Windows XP Home Edition" /fastdetect. The words within quotes are what will appear on the boot menu next to the entry. To customize the text on the menu you can change these words to whatever you wish—for example, "My Favorite Operating System." The /fastdetect switch disables the detection of serial and parallel devices, which allows for faster booting. The detection of these devices isn't normally required in XP, because the functions are performed by plug-and-play drivers, so as a general rule it's a good idea to use the /fastdetect switch. The /fastdetect switch is only one of many switches that can be used in the boot.ini file to customize how the operating system loads. Table 1-1 lists others you can use.

Table 1-1. Switches for boot.ini
Switch
What it does
/BASEVIDEO
Starts XP using the standard VGA driver. It's most useful if you can't boot normally because of a video driver problem.
/BOOTLOG
Logs information about the boot process to the ntbtlogl.txt file in the C:\Windows folder.
/CRASHDEBUG
Loads the debugger at boot, but the debugger remains inactive unless a crash occurs.
/DEBUG
Loads the debugger at boot and runs it.
/FASTDETECT
Disables the detection of serial and parallel devices.
MAXMEM:n
Specifies the maximum amount of RAM that XP can use.
/NOGUIBOOT
Does not allow the XP splash screen to load during boot.
/NODEBUG
Stops the debugger from loading.
/SAFEBOOT:switch
Forces XP to boot into the safe mode specified by the switch parameter, which can be minimal, network, or minimal(alternate shell). In minimal safe mode, only the minimum set of drivers necessary to start XP are loaded. In network safe mode, networking drivers are loaded in addition to the minimum set of drivers. In minimal(alternate shell) the minimum set of drivers are loaded and XP boots into the command prompt.
/SOS
Displays the name of each driver as it loads and gives descriptions of what is occurring during the boot process. It also offers other information, including the XP build number, the service pack number, the number of processors on the system, and the amount of installed memory.

When you've finished editing the boot.ini file, save it. The next time you start your computer, its settings will go into effect.
In our example, if we want the menu to appear for 45 seconds, the default operating system to be Windows 2000, and the XP splash screen to be turned off when we choose to load XP, the boot.ini file should look like this:
[boot loader]
timeout=45
default=multi(0)disk(0)rdisk(0)partition(2)\WINNT
[operating systems]
multi(0)disk(0)rdisk(0)partition(1)\WINDOWS="Microsoft Windows XP Home 
Edition" /fastdetect /noguiboot
multi(0)disk(0)rdisk(0)partition(2)\WINNT="Windows 2000 Professional" /
fastdetect

Create a Startup Menu Even if You Have Only One Operating System

Even if you have only one operating system, you can create a boot menu that will let you choose to load your operating system with different parameters. For example, for menu choices, you might have your normal operating system; a mode that lets you trace any startup problems; and Safe Mode. To give yourself the option of operating systems with different parameters, create separate entries for each new operating system choice. For example, for the version of the operating system that traces potential startup problems, you could create this entry:
multi(0)disk(0)rdisk(0)partition(1)\WINDOWS="Trace Problems XP Home Edition" 
/fastdetect /bootlog /sos
This entry creates a startup log and also displays information about the drivers and other operating system information as it loads.
For the version of the operating system that loads in Safe Mode but that still allows networking, you could create this entry:
multi(0)disk(0)rdisk(0)partition(1)\WINDOWS="Safe Start XP Home Edition" /
fastdetect /safeboot:network
The boot.ini file would look like this, assuming that you want the menu to display for 30 seconds and you want normal XP startup to be the default:
[boot loader]
timeout=30
default=multi(0)disk(0)rdisk(0)partition(1)\WINDOWS
[operating systems]
multi(0)disk(0)rdisk(0)partition(1)\WINDOWS="Microsoft Windows XP Home 
Edition" /fastdetect
multi(0)disk(0)rdisk(0)partition(1)\WINDOWS="Trace Problems XP Home Edition" 
/fastdetect /bootlog /sos
multi(0)disk(0)rdisk(0)partition(1)\WINDOWS="Safe Start XP Home Edition" /
fastdetect /safeboot:network


If you're leery of using a text editor to edit boot.ini directly, you can use the System Configuration Utility [Halt Startup Programs and Services Windows XP] instead. Type msconfig at a command prompt or the Run box and click on the BOOT.INI tab, shown in Figure 1-1. You'll be able to add several switches (but not as many as you can if you edit the boot.ini file yourself using a text editor).


Figure 1-1. The System Configuration Utility

See Also

 
Design by Free WordPress Themes | Bloggerized by Lasantha - Premium Blogger Themes | Top WordPress Themes